

Payment Link In — With Detail
Create a Payment Link In where the asset and network are pre-selected, so the end-user lands directly on the deposit address.
Use the With Detail mode when your application already knows what the end-user will pay with — for example, when you offer a single accepted asset on your checkout, or when you have already let the customer choose elsewhere in your flow. The merchant supplies payInDetails.currency (and payInDetails.protocol where needed) on the Create Payment call. BEEM provisions a deposit address immediately and the end-user skips the asset selection step.
API onlyWith Detail can only be created through the API. The Portal's Request Payment flow does not currently support pre-selecting the asset — use the Without Detail flow if you need a quick Portal-generated link.
1. Create the payment
The Create Payment endpoint accepts the same top-level fields as Without Detail mode, plus a payInDetails object that fixes the asset and network.
Request fields
| Field | Type | Required | Description |
|---|---|---|---|
merchantId | string | Yes | UUID of the wallet that will settle the payment. Identical to the wallet's ID. |
amount | number | Yes | The amount to charge, in the Display Currency. |
currency | string | Yes | The Display Currency code shown to the end-user (e.g. EUR, USD). |
reference | string | Yes | A unique reference for the payment, visible to both you and your customer. |
type | string | Yes | IN for this flow. |
payInDetails.currency | string | Yes | The crypto asset the end-user will send (e.g. USDT, BTC, ETH). |
payInDetails.protocol | string | Conditional | The network code (e.g. TRC20, ERC20, POLYGON). Required whenever the chosen asset is available on more than one network. |
expiryMinutes | integer | No | Link expiry in minutes. Defaults to 1440 (24 hours). |
returnUrl | string | No | Where to send the end-user after they leave the Hosted Payments Page. |
Example request
{
  "merchantId": "00a4af9d-ad4b-42d5-bec4-b7a8c90161fe",
  "amount": 10,
  "currency": "EUR",
  "reference": "ORD-12345",
  "type": "IN",
  "expiryMinutes": 60,
  "returnUrl": "https://merchant.example.com/checkout/complete",
  "payInDetails": {
    "currency": "USDT",
    "protocol": "TRC20"
  }
}
Example response
Because the asset is fixed at creation, the response is fully populated immediately: the deposit address is provisioned, the FX rate is locked, and the amount of crypto required is calculated.
{
  "uuid": "fef4e99d-b41d-4efe-89fd-4fdf41f3f33f",
  "merchantId": "00a4af9d-ad4b-42d5-bec4-b7a8c90161fe",
  "merchantDisplayName": "Metallica Inc",
  "dateCreated": 1704807605678,
  "expiryDate": 1704808805678,
  "quoteExpiryDate": 1704811205678,
  "reference": "ORD-12345",
  "type": "IN",
  "status": "PENDING",
  "displayCurrency": {
    "currency": "EUR",
    "amount": 10,
    "actual": 0
  },
  "walletCurrency": {
    "currency": "EUR",
    "amount": 10,
    "actual": 0
  },
  "paidCurrency": {
    "currency": "USDT",
    "amount": 9.935377,
    "actual": 0
  },
  "feeCurrency": {
    "currency": "EUR",
    "amount": 0.09,
    "actual": 0
  },
  "displayRate": {
    "base": "USDT",
    "counter": "EUR",
    "rate": 0.92635
  },
  "exchangeRate": {
    "base": "USDT",
    "counter": "EUR",
    "rate": 0.92635
  },
  "address": {
    "address": "TTwyxkKzenGBhVX2TsjYLVFfApEQ3hPXGc",
    "tag": null,
    "protocol": "TRC20",
    "uri": "TTwyxkKzenGBhVX2TsjYLVFfApEQ3hPXGc",
    "alternatives": []
  },
  "returnUrl": "https://merchant.example.com/checkout/complete",
  "redirectUrl": "https://pay.hostedpaymentspage.net/payin/fef4e99d-b41d-4efe-89fd-4fdf41f3f33f",
  "transactions": []
}
Two fields to record:
uuid— the payment identifier. Used for subsequent API queries and matched in every webhook payload for this payment.redirectUrl— the Hosted Payments Page URL, if you intend to use the HPP approach below.
For a custom UI, the response already contains everything you need to render the payment page: address.address, address.uri, paidCurrency.amount (how much crypto to send), and displayCurrency.amount (the price your customer was quoted).
2. Direct the end-user to the Hosted Payments Page
Redirect (or iframe) the end-user to the redirectUrl from the response. The HPP renders three screens for a With Detail link — the asset selection screen is skipped.
Screen 1: Deposit address and QR code. The end-user copies the address or scans the QR with their wallet, then sends the funds.
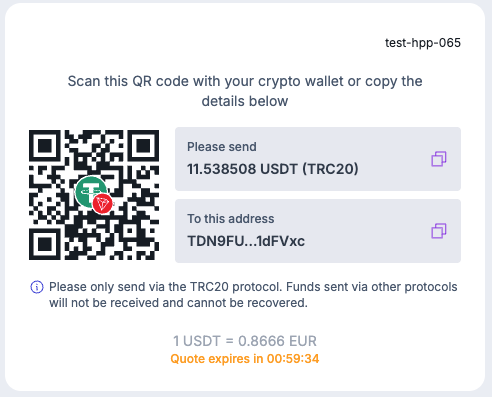
The HPP address and QR screen. End-user copies the address or scans the QR with their wallet.
Screen 2: Pending. Once the transaction is detected on-chain, this screen confirms the payment is in progress. The payment's status moves to PROCESSING and a transaction-detected webhook fires.
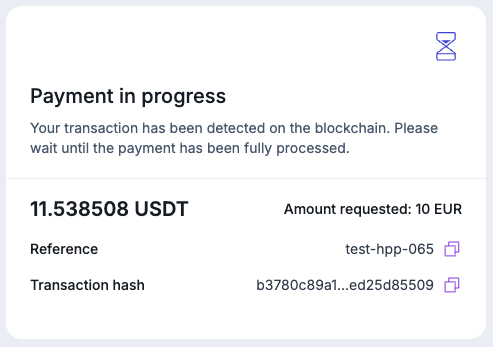
The HPP pending screen. The transaction has been detected on-chain and is awaiting confirmation.
Screen 3: Complete. Once the transaction is fully confirmed, the success state is shown and the wallet is credited. The payment's status moves to COMPLETE and a transaction-confirmed webhook fires.
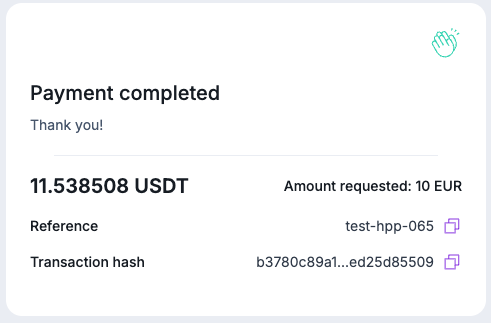
The HPP completion screen. Funds have been received and credited to the merchant wallet.
Building a custom UIIf the HPP does not fit your product, you can build your own end-user UI using the Create Payment response and webhook payloads. The full API specification for this approach is documented separately — contact your Solutions Manager for access.
3. Receive webhooks
Five events fire during the lifecycle:
layer1:payment:checkout:status-change— status transitionslayer1:payment:checkout:transaction-detected— on-chain transaction first seenlayer1:payment:checkout:transaction-confirmed— transaction reaches required confirmationslayer1:payment:checkout:transaction-held— payment held for compliance screeninglayer1:payment:checkout:transaction-late— funds arrived after the link expired
See Payment Link Webhooks for event payloads, the sequence each scenario produces, and recommended handler patterns.
What's next
The mode where the end-user picks the asset and network themselves at the point of payment.
Subscribe to lifecycle events: status changes, on-chain confirmations, holds, and late arrivals.
Handle overpayments, underpayments, and late arrivals.